Wordpress is used on more than 15% of all websites you see on the web today. Some major brands that are using WordPress include: CNN, Download.com, Mozilla Firefox, NYTimes Blog, Samsung, People Magazine, Wall Street Journal Blogs, Rackspace, and more. WordPress is a content management system (CMS) that is extremely powerful. I could sit here and list hundreds of reasons why, but that would be for an entirely different post. Learning how to do updates and other WordPress maintenance tasks on your own is extremely beneficial to website owners. In this blog post I want to give you a basic overview and step by step guide on how to use your WordPress website behind the scenes and in the WordPress Dashboard. Because WordPress is a CMS, it is very user friendly and visual. With a little time and poking around you can write and publish your own blog posts and pages, add images, and much more on your new WordPress website. Let’s get started:
Topic Navigation
How to Login to WordPress
The WordPress Dashboard
How to Create a New Post
How to Add Images
Publishing a Post and Categories
How to Add a New Page
The Media Library
Information on WordPress Updates
Additional WordPress Resources
[Video] How to Upload Media to WordPress
How to Login to WordPress
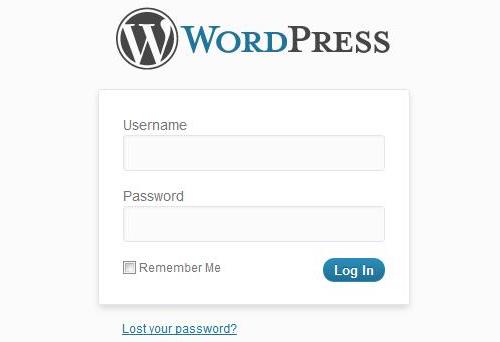
First you will need to open up your web browser whether it is Google Chrome, Mozilla Firefox, Safari, Internet Explorer or any other it does not matter (everyone has their favorite). Now in the address bar you will need to type in your websites URL followed by: /wp-admin. Some people find it easier to just go to their website and then click into the address bar and enter the last part; do what works easiest for you. In the end you should have something that looks like this [http://examplesite.com/wp-admin]. Now hit enter and you should be redirected to the login screen that is shown in the picture below.
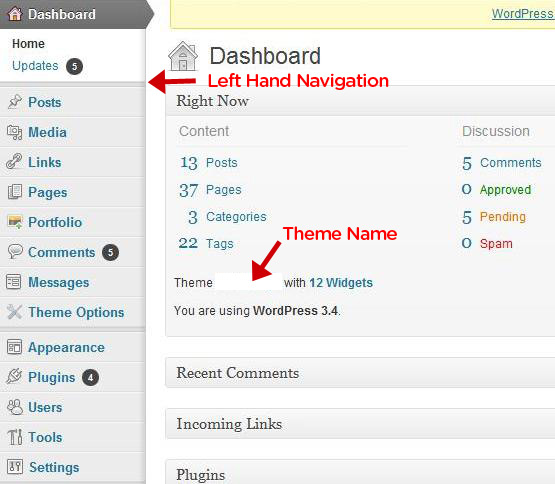
After you enter your details, click the login button to be taken to the WordPress Dashboard. Below is a picture of the WordPress Dashboard that should now be visible right before your very own two eyes. This is the main screen that has a navigation menu to the left, information about your website and its posts, pages, comments, theme and more in the middle and some other options that you may or may not use. Please note that your navigation menu may appear slightly different because different theme options and plugins will show up on your navigation menu on the left hand side. Each dashboard however will have the standard left menu options: Posts, Media, Links, Pages, Comments, Appearance, Plugins, Users, Tools and Settings.
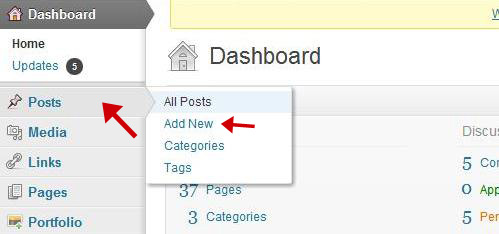
When viewing the dashboard, look to the left navigation menu and hover over the word “posts.” Depending on which WordPress version you are currently using, you may have to click on the word posts to see the options. It is important to be using the most up to date version because of security issues and other functionality, but we’ll focus on updates later on. You should see several options including: all posts which will display all of the posts on your website in a neat column, add new which is what we will be doing, and categories which is where you can create and manage your posts categories (ie: blog, press, and more). Click on the “add new” option and you will be redirected to the admin screen where you can start creating a new post for your website or blog. If you are confused, refer to the picture I have included below.
The Add New Post Screen
You should now be viewing the “add new post” screen which is where you will go each time you want to create and publish a new post on your website. This screen is very user friendly and you should be able to familiarize yourself with most of the options that you will use as a beginner. First, at the top right of the page you will see a tab that says screen options. It will drop down a menu that will show all of the options that you may display, or choose not to display on this add new post admin page. A very useful one is the discussion option which is often unchecked. When you check this it will add this section to the page below where you will be working on your post. Then under this section you can choose to allow comments and trackbacks to your post, or you can disable them so you do not have to do comment moderation; the choice is yours.

Now let’s see how to work on a post, save it as a draft and publish it when it is ready. First create a title by clicking in the title box and entering your title. Next you may move onto the body of your post by clicking in the large white body area. Either type the entire post right here in the body box or you can create it in a Microsoft Word document and then paste it in using the button in the post options menu (see photo below). If you are using anything other than Microsoft Word and you copy and paste the text directly into the white text box it will often return lots of styling and other bloated code that is not necessary and can be bad to your site. This can be seen by clicking on the HTML tab and viewing the raw text and HTML coding language. For beginners I would suggest you either write it directly in the body area, or use the Microsoft Word import button function. Above the body text area, there is a header that contains all of the styling, linking and other options for your posts. Look at the image below if you are confused. You can hover your mouse over each option to get a description of what it will do. To apply the style, simply highlight the string of text that you wish to apply the element to and then select the options. Try out something easy like bolding first.
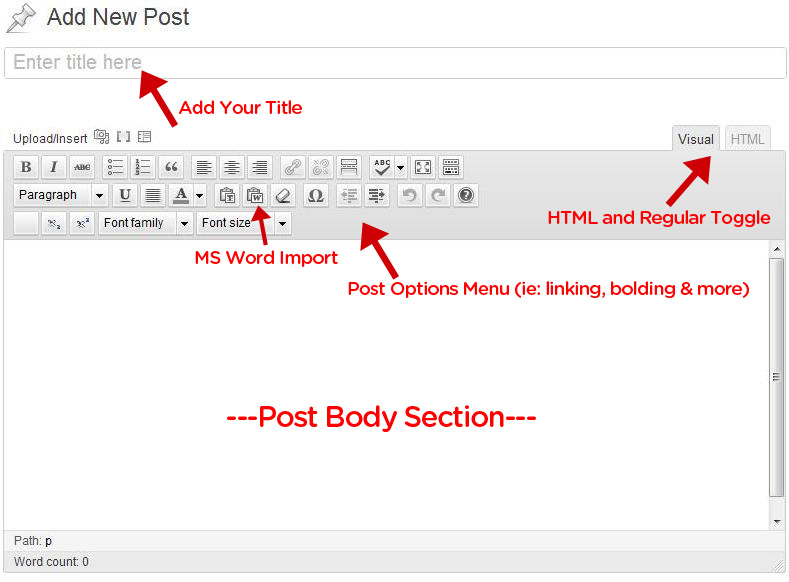
How to Add Images & Set a Featured Image
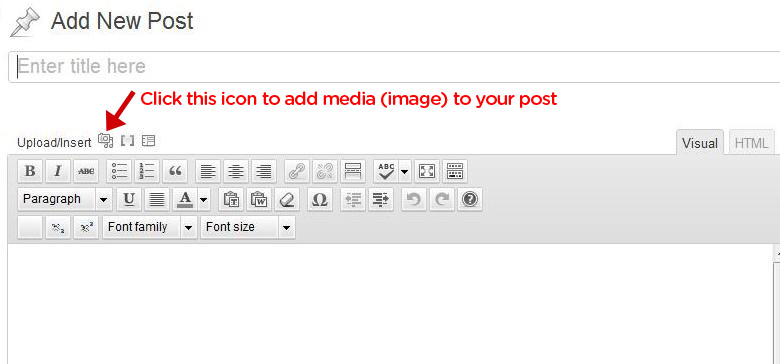
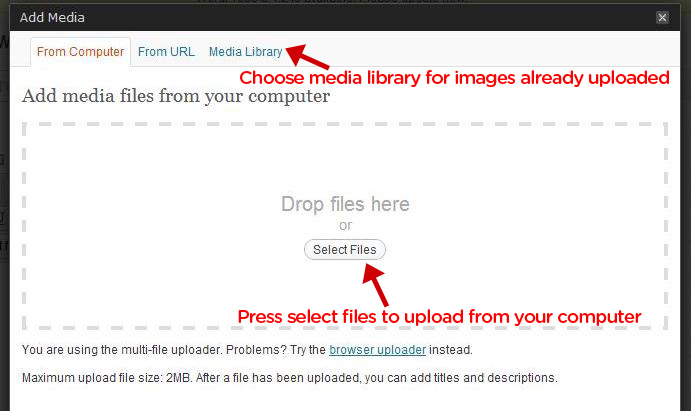
While WordPress is a standardized CMS, it may vary in options and website functionality depending on the plugins and themes that you use. On some themes when you select and set a featured image, it will display the image inside the post and on the blog list or homepage, while on other themes you may have to do it manually. Just use the preview button before publishing anything and you will be fine. To add an image into your post, simply click inside the body area where you wish the image to be rendered. Next (see photo below) click the media icon and then you will be presented with a add media lightbox that gives you three separate choices. The choices are: from computer which will allow you to upload a photo, the next is from URL which allows you to upload a photo from another web location (the URL of the photo), and finally media which lets you sift through current images that you already have uploaded into WordPress.
Once you select an image to upload or select media you will be presented with a screen full of information and options (see photo below). For search engine optimization (SEO) you should be naming your photos based on real searchable keywords and also using your keywords in the “Alternate Text” field as well. In the example below, the keyword being targeted was “small business SEO.” Next if you look further down you will see alignment options. You can experiment with these as some will wrap around text (left,right) or you can center the image on the page, or just make it position to the left of the page without wrapping around the text by using ‘none.’ After you’ve decided how you want to display the image and have selected an option, you may choose the size of your image. For most purposes the full size will be the most commonly used selection. Finally, when you have filled out all of the information that you want and have made all the selections needed, click the save all changes button at the bottom left. Now if you only have one image uploaded to this post it will still display, if you have more than one it will bring up a new menu that has a list of the media attached to the post. Just click show and it will show you the same screen you were just looking at prior to clicking save all changes. Lastly, click the “insert into post” button and the image will be placed where you placed your cursor. If you need to edit the image or remove it, simply hover over the image inside the text on the page and select either the image icon or the ‘X’ icon to delete it.
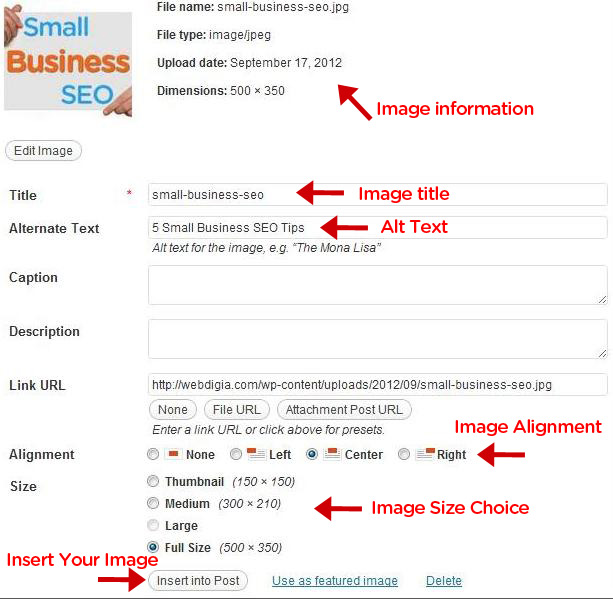
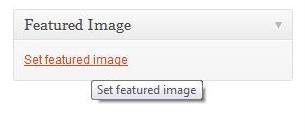
The next step is to select the featured image for your post. The reason the featured image is so essential is because it is what becomes associated with the content. When you or your visitors share your post on social media and other areas, the photo will often be displayed next to the title and description. On the right hand side of the screen underneath the categories section you will see a section called the featured image. Follow the same steps as you did in the previous section for images except this time click the use as featured image button.
Publishing a Post and Selecting a Category
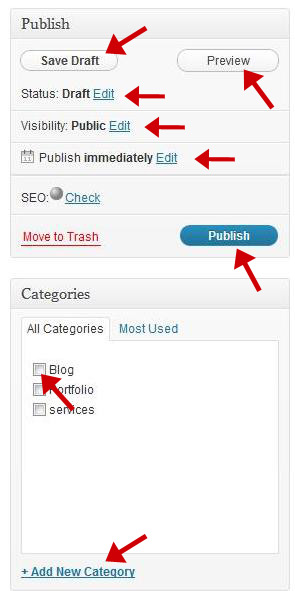
Now that you have a decent understanding of the icon toolbar and how to write and style your post, it’s time to see the publish choices. You have the option to publish it immediately or to set it up to auto-post at a later time and date. Look to the right column and find the publish and categories box. Locate the draft and preview buttons inside the publish section. The preview button will allow you to see your progress as it would look on your web page in real time, and the draft is simply a save feature. Below these you will see three properties with edit links next to them: status, visibility and publish. Experiment with these by selecting the edit link and get familiar with these and what they do.
Before you finalize anything you will want to make sure that you have selected the post to be applied to the proper category. Below the publish section is a section titled “categories.” By default, WordPress will usually place your post in the top category unless you specify otherwise. Select which category it belongs in (ie: blog) or create a new category if you need to by clicking the link at the bottom of the section and naming a new category and adding it to the list. After this you are ready for publishing. If your post is as ready as it will ever be and you don’t wish to auto-schedule it, then simply press the “Publish” button and your post will publish immediately as indicated.
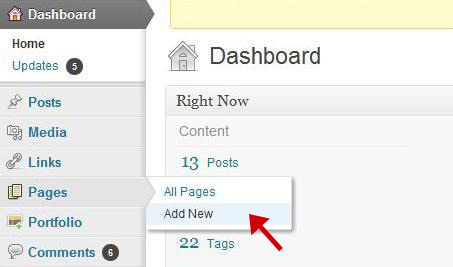
Adding a WordPress page should be very straightforward for you if you have a firm grasp on adding a new post. The process is exactly the same except you will not need to select any categories as it will create an entirely new page versus adding a post into a group of other similar categorized posts. Find and navigate at the left hand menu the pages tab and then select add new. If you get confused at all during the process of adding a page, refer to the sections above on adding a new post.
As you upload new images you may wonder where they are all stored and how you can access them again. All of your images are stored neatly in the media section. Look at the left hand navigation again and find the media tab. You can view the entire library and you can also add new images to the media library using this feature. I recommend you visit each navigation tab on the left and just get familiar with them by looking around. If you are concerned you will mess something up, just don’t go changing anything significant like features and options until you have a firm understanding of what they are. The WordPress CMS is much like any other program, it is best learned by actually doing something inside of it.
WordPress Updates and What They Mean
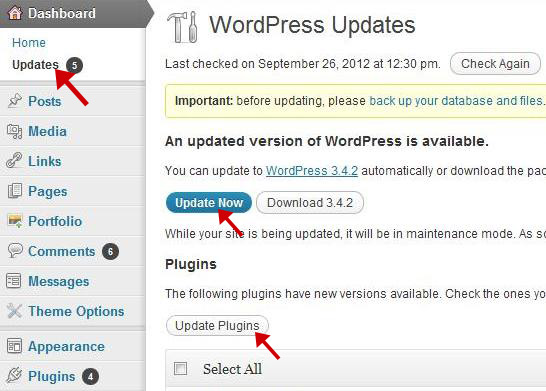
If you have noticed in many of the images from this post, there is a long rectangle box at the top of the screen that contains an update. For illustration purposes I made sure that was there so that I could touch on WordPress updates. You will also notice in the images that in the navigation on the left hand side of the dashboard that there are numerical numbers next to certain options. The top update will show all updates that are currently pending, while the numerical number next to the plugins will show all updates for currently installed plugins. WordPress is a very secure platform and often when an update to WordPress goes out it is to fix a security threat. This isn’t always the case as sometimes it is for better options and functionality and you can read what each update provides, but it is better to always be on the latest version. Plugin updates may also fix security threats, but more often than not they are primarily for increased functionality, options and aesthetics.
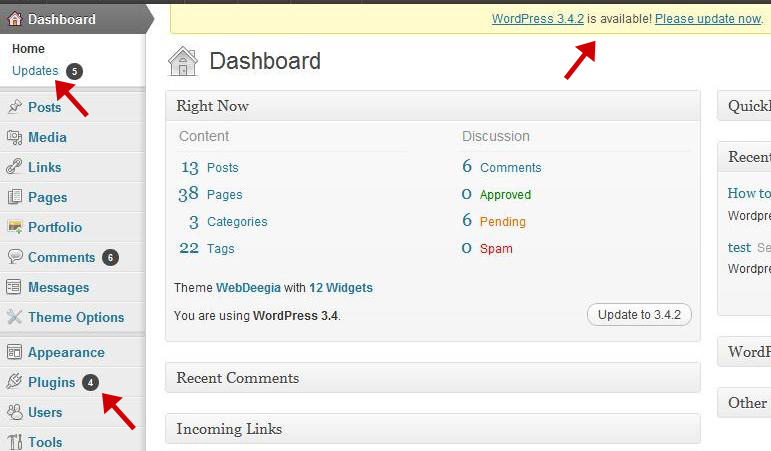
Below I have included a picture of the updates page as well. You will see a notification on the page to make sure you backup your database and files before updating the WordPress version and this is because sometimes an update will change or alter the design or functionality of your website. Webdigia does daily backups to all websites on our servers so in the event that something does occur we can restore your website and figure out the problem. Plugins may also change in their own functionality when updated, but this is usually less common.
There are a lot of other areas to cover within WordPress, but this should give you a basic understanding of how to navigate around the dashboard, how to publish a post, how to publish a page, add images and their properties, and update your plugins and WordPress version. Take some time to experiment and even setup a test post or page that you can just continually save as a draft and hit preview to see how it looks in a browser without ever publishing it. Being able to log into your WordPress website and add blog posts to increase the authority of your website and provide useful content to your clients or followers is a great first step towards using WordPress. I hope you enjoyed this brief walk through.

Share